
Ever wondered how you can keep your bathroom spick-and-span without resorting to harsh chemicals and expensive cleaning solutions? In the quest for a clean, sparkly bathroom, many people often overlook the cost-effective and eco-friendly option sitting in their very own pantry. Yes, you guessed it right! We’re talking about Homemade DIY Shower Cleaners.
We’re here to guide you through the process of making your very own DIY Shower Cleaner and DIY Daily Shower Spray. These concoctions aren’t just easy to whip up, they’re also incredibly effective. Whether you’re dealing with soap scum, hard water stains, or just maintaining everyday cleanliness, these Homemade Shower Sprays and DIY Bathroom Cleaners have you covered.
As an added bonus, making your own Homemade Bathroom Cleaner not only saves you money but also reduces your home’s environmental footprint — a win-win situation! So, stick around and we’ll show you how to make the Best Homemade Shower Cleaner and your very own Homemade Daily Shower Cleaner.
Homemade DIY Shower Cleaner: The Ultimate Guide
Let’s talk about homemade shower cleaners. Why should you buy expensive, chemical-laden shower cleaners when you can make your own eco-friendly, cost-effective DIY shower cleaner right at home? Not only can these homemade solutions rival store-bought cleaners, but they’re also simple to make and use. So, let’s get started!
DIY Shower Cleaner Recipe
First, let’s start with a basic homemade shower cleaner. You’ll need just two simple ingredients that are most likely already in your pantry: white vinegar and dish soap. The vinegar cuts through soap scum and mildew while the dish soap aids in the process and leaves a shine. Here’s how to make it:
- Heat one cup of white vinegar in the microwave or on the stove until hot, but not boiling.
- Combine this with one cup of dish soap in a spray bottle. Shake well to mix.
- Spray your shower generously with the mixture and let it sit for a few minutes before scrubbing and rinsing.
DIY Daily Shower Cleaner
Moving on to our DIY daily shower cleaner. This homemade daily shower cleaner is perfect for maintaining the cleanliness of your shower between deep cleans. It is easy to use: after you’re done with your daily shower, simply spray the cleaner on the shower surfaces and leave it. No need to rinse. Here’s the recipe:
- Mix together one part water and one part vinegar in a spray bottle.
- Add a few drops of essential oil (like tea tree or lavender) if you’d like a fresh scent.
- Shake well and use daily after showering.
Tip: For the best homemade shower cleaner, use distilled water and white vinegar for a spotless shine every time.
DIY Shower Spray and Homemade Bathroom Cleaner
Your homemade shower spray can double as an excellent homemade bathroom cleaner. This DIY bathroom cleaner can be used on tile, grout, and even toilet bowls. Here’s how you make it:
- Mix two cups of vinegar, one cup of baking soda, and three tablespoons of dish soap in a large spray bottle.
- Add five to ten drops of an essential oil of your choice to give your cleaner a pleasant scent.
- Shake the bottle well to combine the ingredients.
- Spray on the surfaces you want to clean, leave it on for a few minutes, then scrub and rinse.
These homemade DIY shower cleaners not only work wonders on your bathroom surfaces but also keep your bathroom smelling fresh and clean. So, get your DIY groove on and start making your own shower cleaners today! It’s simple, cost-effective, and a great step towards a cleaner, greener home.
The Best Homemade Shower Cleaner Recipes to Try
Stepping into a clean, fresh-smelling shower can set the tone for your entire day. Yet, store-bought cleaners often contain harsh chemicals that can irritate skin and cause harmful fumes. That’s where the DIY option comes in. With a few simple ingredients, you can concoct the best homemade shower cleaner, perfect for daily use. Let’s explore some easy-to-follow recipes for your DIY shower cleaner.
1. The Classic Vinegar and Dish Soap Cleaner
For a DIY shower cleaner that packs a punch, you can’t go wrong with the classic vinegar and dish soap combo. Here’s how to make it:
- Fill half a spray bottle with white vinegar.
- Fill the rest of the bottle with a dish soap of your choice.
- Shake well to mix the two ingredients together.
- Spray onto your shower surfaces and scrub with a sponge.
- Rinse well with water.
2. Baking Soda and Vinegar Cleaner
Another fantastic homemade shower cleaner incorporates the cleaning power of baking soda. Here’s your guide:
- Combine a half cup of baking soda with a third cup of vinegar in a spray bottle.
- Once the fizzing stops, screw on the top and shake well.
- Spray the mixture onto your shower surfaces.
- Wait 15 minutes then scrub and rinse.
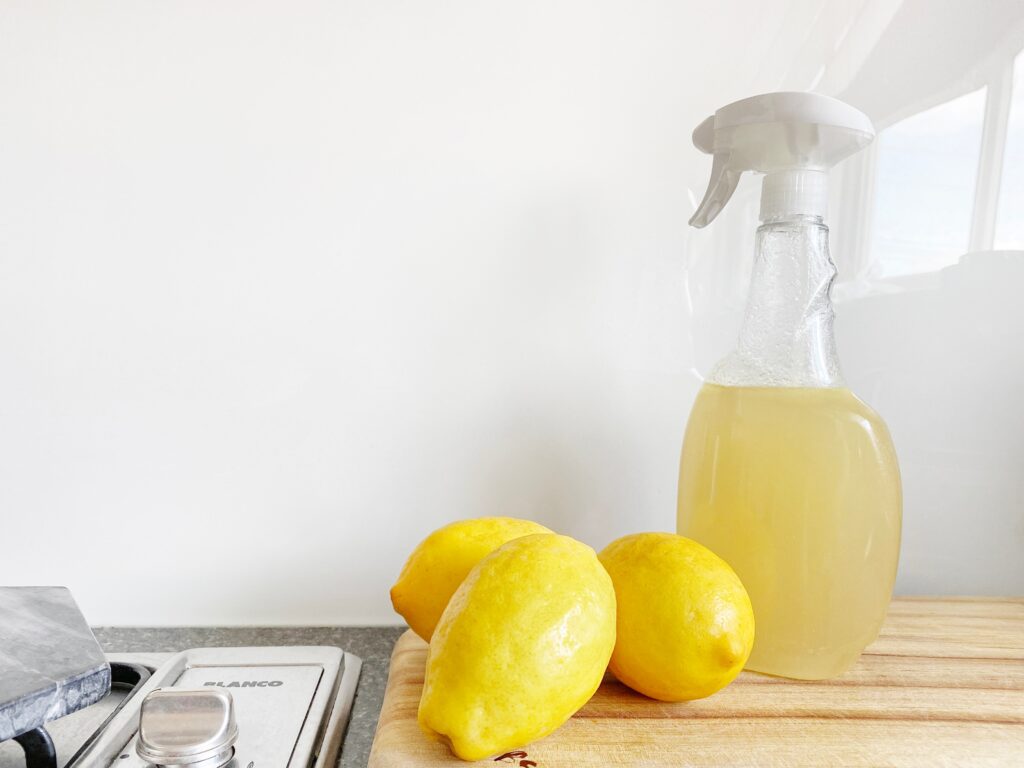
3. Citrus and Vinegar Shower Spray
If you’re looking for a homemade shower spray with a pleasant aroma, a citrus and vinegar combination might be your best bet. Here are the steps:
- Fill a spray bottle half full with white vinegar.
- Add the juice of one lemon or orange.
- Top off with water and shake well.
- Spray and scrub your shower surfaces, then rinse.
4. Hydrogen Peroxide and Tea Tree Oil Cleaner
This DIY bathroom cleaner is excellent for mold and mildew. Here’s how to bring this recipe together:
- Combine 1 cup of hydrogen peroxide with 2 tablespoons of white vinegar in a spray bottle.
- Add 10 drops of tea tree oil and shake well.
- Spray the mixture on your shower surfaces.
- Wait 10 minutes then scrub and rinse.
Remember, a well-maintained shower doesn’t just require cleaning; it’s also about regular upkeep. Consider using your DIY daily shower cleaner after each use to keep your bathroom fresh and shiny. Not only will you be saving money with these homemade options, but you’ll also eliminate unnecessary chemicals from your cleaning routine. Happy cleaning!
DIY Daily Shower Cleaner: Quick and Easy Recipe
When it comes to maintaining a sparkling clean bathroom, a daily spritz of a DIY shower cleaner can make all the difference. This homemade daily shower cleaner is not only cost-effective but also free of harsh chemicals. So, let’s dive right into how to make a powerful DIY daily shower cleaner.
Ingredients Required:
- 1/2 cup of hydrogen peroxide
- 1/2 cup of rubbing alcohol
- 1 teaspoon of liquid dish soap
- 1 tablespoon of dishwasher rinse aid
- 3 cups of water
Instructions:
- Start by pouring the hydrogen peroxide, rubbing alcohol, and dish soap into a 32 oz spray bottle.
- Next, add the dishwasher rinse aid and water to the mix.
- Shake the bottle vigorously to mix the ingredients thoroughly.
- Your DIY daily shower cleaner is ready for use. Spray daily on the shower tiles and glass to keep soap scum and mildew at bay.
Tip: Always rinse the shower with warm water after spraying this DIY cleaner, and be sure to ventilate the area properly.
Note: Although this homemade daily shower cleaner is made from common household items, it’s important to perform a small test patch on your shower surfaces before wide-spread use to ensure no adverse reactions occur.
By whipping up your own homemade shower spray, you’ll be taking a step towards a cleaner, greener home. Not only is this DIY shower cleaner effective, but it’s also easy on your wallet and your health. So, why not give it a try and see the results for yourself?
Say Goodbye to Grime with DIY Shower Spray
It’s time to kick that grime to the curb with your very own DIY shower spray. Not only is this homemade shower cleaner effective, but it’s also simple to make and eco-friendly, using everyday household items. The beauty of this DIY bathroom cleaner is that it works as both a daily cleaner and a powerful scour for those tougher grime situations.
Ingredients:
- 1 cup of white vinegar
- 1 cup of water
- A few drops of essential oil (optional)
To prepare this homemade shower spray, start by heating the vinegar until it’s warm but not scalding. You can use a saucepan on the stove or a bowl in the microwave. Heating the vinegar helps it mix better with the other ingredients, especially if you’re using essential oils.
Note: If you’re adding essential oils, always be mindful of the quantity. A little goes a long way and overdoing it can lead to an overpowering scent.
Next, combine the warm vinegar and water in a spray bottle. If you chose to use essential oils, add them now. Shake the bottle well to mix the ingredients. Voila! You’ve got your own DIY shower cleaner.
For the best results, spray this concoction on your shower surfaces every day after use. The vinegar works to break down the soap scum and hard water deposits, leaving your shower spotlessly clean. Plus, if you’ve used essential oils, your bathroom will smell amazing!
Maintaining Your Homemade Shower Cleaner
Maintenance is a breeze. Simply shake the bottle before each use to ensure the ingredients are well mixed. If you notice the solution becoming too vinegary or the scent fading, feel free to add more water or a few more drops of essential oil. Remember, this is your homemade bathroom cleaner, so adjust it to your liking.
There you have it – the best homemade shower cleaner that doubles as a daily shower spray. Easy to make, cost-effective, and efficient, this DIY shower cleaner is the perfect ally in your fight against bathroom grime.
Homemade Bathroom Cleaner: The All-Purpose Solution
So you’ve been searching for the best homemade shower cleaner, haven’t you? Well, look no further. Let’s dig into the world of DIY bathroom cleaners and unveil a simple, effective homemade solution you can whip up in no time.
Ingredients for the Best Homemade Bathroom Cleaner
First things first. To prepare your DIY shower cleaner, you’ll need the following items:
- 1/2 cup of white vinegar
- 1/2 cup of Dawn dish soap
- 1 cup of water
Steps to Create Your Homemade Shower Cleaner
Now that we have our ingredients, let’s get into the steps required to create this DIY shower spray:
- Heat the vinegar in the microwave until hot and pour into a spray bottle.
- Add the Dawn soap. Place the lid on the bottle and gently shake to mix.
- Add the water to the bottle. Shake well to ensure everything is mixed thoroughly.
Voilà! You now have your homemade bathroom cleaner. But how do you use it?
How to Use Your DIY Shower Cleaner
Using your DIY daily shower cleaner couldn’t be simpler. Here’s how:
- Spray liberally around your shower and let it sit for a few minutes.
- Scrub with a brush or sponge to remove any stubborn grime.
- Rinse well with water.
- For best results, use your homemade shower spray daily.
Tip: For an extra clean finish, consider using a microfiber cloth to wipe down your shower after rinsing.
There you have it! A homemade DIY shower cleaner that’s easy to make and effective to use. Give this homemade daily shower cleaner a try and enjoy a sparkling clean bathroom without the harsh chemicals of store-bought products.
DIY Bathroom Cleaner: Keeping Your Bathroom Fresh
So, you’re eager to keep your bathroom fresh and sparkling, but tired of the harsh chemicals and hefty price tag of store-bought cleaners? I’m glad you’re here! Because today, we’re diving into the world of homemade DIY bathroom cleaners. This easy-to-follow DIY bathroom cleaner recipe will leave your bathroom smelling fresh and looking spotless.
Ingredients You’ll Need:
- Vinegar: This is a natural descaler and disinfectant.
- Baking Soda: It’s a great abrasive cleaner that can tackle tough stains.
- Essential Oils: These will give your homemade bathroom cleaner a pleasing aroma.
Steps to Make Your DIY Bathroom Cleaner:
- Prepare Your Ingredients: Gather together 1 cup of vinegar, 1/2 cup of baking soda, and 10-15 drops of your favorite essential oils. Lemon or lavender oils are great choices for a fresh, clean scent.
- Mix the Vinegar and Baking Soda: Pour the vinegar into a bowl or bucket and then slowly add the baking soda. Be careful, this mixture will fizz!
- Add Essential Oils: Once the fizzing subsides, add your chosen essential oils and stir well.
- Transfer to Spray Bottle: Pour your DIY bathroom cleaner into a spray bottle for easy application.
- Clean Your Bathroom: Spray the cleaner onto surfaces, allow it to sit for a few minutes, then scrub and rinse away. You’ll be amazed at the sparkling results!
By making your own homemade DIY bathroom cleaner, not only are you reducing the amount of chemicals in your home, but you’re also saving money. Plus, you’re contributing to a greener planet by reducing plastic waste. Now, you’ve got the best homemade shower cleaner at your disposal, ready to tackle grime and leave your bathroom smelling fresh!
Remember, this homemade daily shower cleaner can also double as a DIY shower spray. Just spritz it onto your shower tiles and glass doors after each use to keep soap scum at bay. It’s the ultimate multi-tasking DIY shower cleaner!
Tip: Always test a small, hidden area first to ensure the cleaner is safe for your surfaces.
Tips for Using Your Homemade Shower Cleaner
Once you’ve crafted your homemade shower cleaner, you might be wondering, how best to put your DIY prowess to good use. Fret not, because here are some tips and tricks to get the most out of your DIY shower cleaner, whether it’s a daily shower spray or a deep cleaning concoction.
1. Test Your DIY Shower Cleaner
Before you embark on a full-blown bathroom cleaning spree, it’s a good idea to test your homemade shower cleaner on a small, inconspicuous area first. This is especially important if you’re using a new recipe for the first time. While these DIY ingredients are generally safe for most surfaces, certain finishes might react differently. So, always err on the side of caution.
2. Let it Sit
Patience is key when using your DIY bathroom cleaner. Spray the cleaner liberally on your shower doors, tiles, and tub, then let it sit for a few minutes. This allows the cleaning agents in your homemade shower spray to penetrate and break down the soap scum and grime, making it easier for you to scrub away.
3. Scrubbing is Essential
No matter how powerful your homemade shower cleaner is, a little elbow grease goes a long way. Use a scrub brush or an old toothbrush for those hard-to-reach nooks and crannies. Remember, the goal here is to make your bathroom sparkle!
4. Rinse Thoroughly
After scrubbing, make sure to rinse the shower thoroughly. Any leftover DIY shower cleaner can leave behind a residue, which can attract more dirt and grime. A handheld shower head or a bucket of water will do the trick. The cleaner your rinse, the fresher your bathroom will feel.
5. Maintain With a DIY Daily Shower Cleaner
Maintaining a clean shower can be a cinch with a DIY daily shower cleaner. Simply spray down your shower after each use to keep soap scum and hard water stains at bay. It’s a quick and easy habit that can make your deep cleaning tasks less daunting.
There you have it! With these tips and your best homemade shower cleaner at your disposal, a sparkling clean bathroom is just a spray away. Happy cleaning!
How Often Should You Use Homemade Daily Shower Cleaner?
How often you use your homemade daily shower cleaner really depends on your household’s needs and cleanliness habits. However, a commonly recommended frequency is once a day. This provides the best defense against the buildup of soap scum, hard water stains and mildew that can occur in your shower.
This DIY shower cleaner works wonders in maintaining a squeaky-clean shower, reducing the need for a deep scrubbing session. Here are some typical scenarios for using your homemade shower spray:
- Heavy Use: If your shower sees a lot of traffic – maybe you’ve got a big family or housemates – using the DIY shower spray once a day, after the last person has showered, can be highly beneficial.
- Moderate Use: For smaller households, where the shower isn’t used as much, spraying every other day or even every few days can be sufficient to keep things tidy.
- Light Use: If the shower is rarely used, such as in a guest bathroom, a weekly spritz with your homemade bathroom cleaner should do the trick.
Remember, using a DIY daily shower cleaner isn’t just about tackling visible dirt or grime. It’s also about dealing with invisible threats like bacteria and other potential pathogens. Hence, even showers that appear clean can benefit from a regular spray.
Find out what works best for your home and adjust the frequency of usage accordingly. After all, the magic of the best homemade shower cleaner is in its regular and consistent use!
DIY Shower Cleaner FAQs: Answering Your Most Pressing Questions
Everyone has questions when it comes to making your
0 Comments